


2 easy ways to instantly improve your smartphone photos!
- WildWillowWays

- Jul 13, 2020
- 7 min read
Updated: Jun 23, 2021
Have you ever wished your smartphone photos looked as good as those amazing photos you see posted online? Have you ever wished you could give your images a bit of extra ‘punch’ but don’t want to spend a lot of time doing it? Have you ever wondered if there is a ‘quick fix’ for improving your photos without having to navigate the ins and outs of an image processing programme? If you have answered yes to any of these questions, then you might be interested in learning about two easy steps that will give your photos that extra ‘pop’ without having to spend a lot of time or energy doing so.
Unless you are really into photography you probably don’t want to bother with post-processing your photos, apart from maybe doing some ‘touch up’ work on your camera software. There are also those who feel that we should leave photos as they come out of camera; that post-processing is ‘cheating’. My view is that, since it is our cameras that initially process our photographs, adding a little bit of post-processing is simply putting some of our own creativity to our images.
Phone cameras are becoming more sophisticated all the time, so much so that we are led to believe that if we get the next generation phone with its ‘best camera ever’ we will have nothing to do but point and shoot to capture amazing photos. This is true to some extent, if we know something about how to compose and how to use light to get the most pleasing images. And if we know these things, we will capture good images with almost every modern camera. The camera can do so much, but we can do more. We can improve the highlights and shadow areas of our images, enhance the colours, even improve the composition with some subtle tweaks. This gives us some creative control over our images as well as the satisfaction of seeing the improvements we can make, turning good shots into great ones.


I think that the slight adjustment to the temperature in the second image gives it a warmer, more natural feel
Try these 2 simple steps to better photographs
Many of us are probably content with posting our images on social media straight out of camera, yet by using these 2 simple ways that can make your phone photos pop you will have better looking photos in seconds! Firstly you need to download an app called Snapseed. Snapseed is available for both iPhone and android, with slight variations depending on your phone. It is owned by Google and is considered to be one of the best photo editing apps around. It is also free and can be as simple or as complex as you want to make it.
When you open Snapseed and tap Open on the top left you will be taken to your photo collection. Choose the photo you want to work on, and it will open in the Snapseed app. On the bottom of the screen you get three options Styles (or Looks), Tools and Export. Styles give us some pre-set options, which I normally don’t go for. The main tab is the Tools tab, which opens the main menu.

There are a lot of options here for those who want to spend a bit of time experimenting with different looks. I wrote a previous post on using Snapseed for the first time https://www.wildwillowways.com/post/snapseed-a-quick-review in which I experimented with some styles. The Tune Image tool is really the basis of Snapseed photo editing and I use it when I want to make a number of enhancements to my images but in this post I am going to keep the process even simpler and concentrate on 2 simple tools that can make a big difference to your photos.
1. White balance
The first edit I usually make is to fix the white balance. Cameras are known for not reading lighting correctly, so this is a quick way to fix the colour temperature and tint. There is a whole colour theory behind this concept but for now its ok to just concentrate on the results we get by adjusting white balance. You will find the white balance option on the top line in the Tools menu.
After opening the option my initial move is to look at what the app has to offer by clicking on auto white balance (AW) on the bottom of the screen.


The changes using automatic white balance are often subtle
I let my eye decide whether this is more pleasing than the original. Sometimes this is all I need to do. If I’m not happy with the result that the auto white balance gives, I can manually adjust the value of the temperature and tint by scrolling vertically to bring up the two options and scrolling horizontally to make the adjustments.


In my opinion the colour of the flower and the leaves is more vibrant with the white balance adjustment in image 2


In this image automatic white balance did not give the effect I wanted so I worked on the image using the white balance sliders. You can move the sliders until you get an effect you like


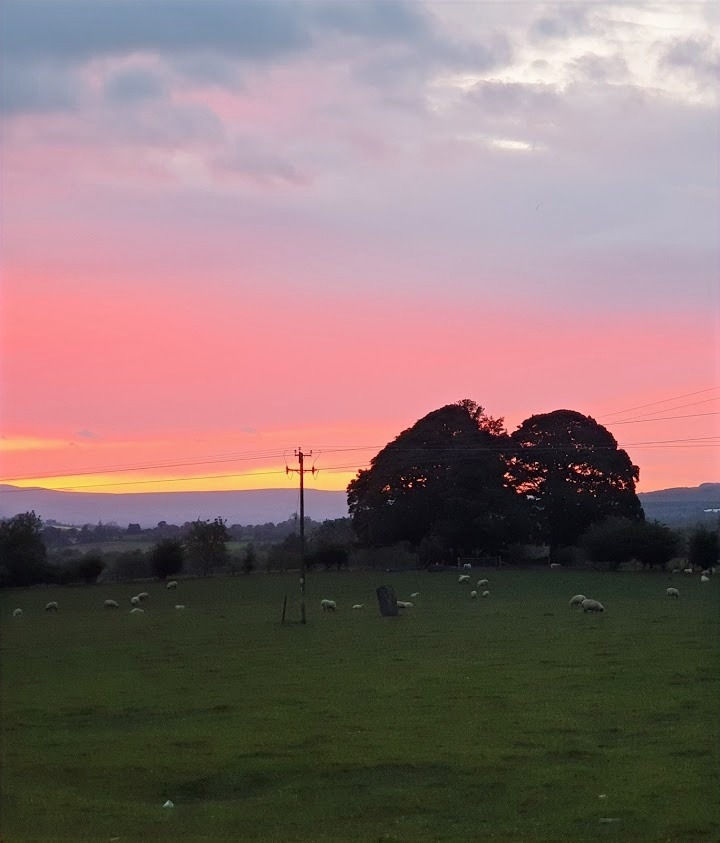
With these two images I just used the automatic white balance and I like the result. I think the first image is cold while the white balance adjustment warms the second image slightly. Again, the change is subtle and can be enhanced further if required


Some people prefer a cooler image; this is possible by choosing negative values. I usually prefer to warm an image slightly but the choice is yours
2. Crop
The second edit that I believe can make a subtle but significant difference to our images is using the Crop tool. The question of whether to crop our photos is one that fuels debate among photographers. Some lament the inevitable loss of megapixels when we crop an image, others feel that we should compose our images correctly in the first place. The argument against cropping because of loss of megapixels is a valid one, particularly if we want to print in large sizes, but most people probably won’t be printing in large sizes so a small amount of cropping will not do too much harm. Obviously, it would be better to achieve the perfect composition when shooting but sometimes that doesn’t happen, and we end up with our subject in the wrong position or with an unwanted distraction in our finished shot. In these cases, cropping the image can make the difference between getting an image that is worthwhile or discarding the image as useless.
One of the most well-known composition techniques in photography is the rule of thirds. Put simply, this means placing our subject off centre, although more accurately the rule of thirds suggests that if we divide our frame with two vertical and two horizontal lines and we place our subject or subjects at or near one of the four intersection points, the result will be an image which is more powerful and more visually appealing. It is obviously best if we try to achieve this when taking the image in-camera, but photography is often about capturing split-second moments and if we rush to capture an image before it disappears, or if for some other reason our subject is not in the optimum location in the frame, a little bit of cropping can rectify the situation. In addition, the crop tool can improve our storytelling abilities in our photography by cutting out unwanted elements from our frame to place the focus on the essential storytelling elements.
In the following image both the composition and the storytelling aspect can be improved by a simple crop. In the image the child is almost centre frame. By using crop, I can position her so that she is placed to one side and appears to be walking into the picture, which is a more pleasing image. From a storytelling point of view, I can imagine the child letting go of an adult’s hand and venturing off, so placing her at the side of the frame conveys that element more accurately, in my view.


In the next images the two main trees are placed in the centre. This is not the most pleasing position in which to place a main subject. A crop can place the trees on either side of the frame.


Which crop should you use?
From the Tools menu I open Crop and I see that the 3x3 grid overlays my image. I get the option to pick a crop from the various aspect ratios or to do a free crop. It is a good idea to experiment with each of these crop settings to see which one suits your image best. If we want to concentrate on a subject in a frame rather than take in the overall scene, if we want to remove unwanted areas from the image or enhance the composition of the image, a free crop will allow us to do that, but the other options shouldn’t be discounted. If you are posting online, for example, and want a square crop, it’s achievable with one click here. Similarly, if you are printing your images it is preferable to go with the standard aspect ratios.
This is a picture of a squirrel that I took in my local park. I got as close as I could without scaring him away, but later I cropped the image to bring the squirrel closer! A point to remember is that a phone camera obviously has less megapixels than a top of the range camera so the amount we can crop has to be adjusted accordingly. While cropping should be used sparingly as it does reduce the quality of the image, it can still be a powerful tool to improve the composition of our images.


In the example below, I used both the Crop and WB tools to make slight changes to this image.


I used the crop tool to remove the distraction at the top of the image, and automatic white balance to adjust the white balance.
As you become more familiar with this app and use these two options more frequently, you will soon have an easy shortcut that will enhance any image.
Snapseed is a very versatile editing app particularly suited to enhancing your smartphone images. Normally the place to start is with the equivalent of the basic panel on most image processing programmes, the Tune Image Tool. There are many tutorials online which teach us how to get the best out of this tool as well as uncovering the many advanced features of the Snapseed app.


Love these tips on white balance and cropping! A great third step to add before editing is opening whitescreen on your phone in fullscreen it instantly shows you how accurate your smartphone display's white balance and brightness really are, so the adjustments you make in Snapseed look just as good on other screens as they do on yours!